No Bake Black Forest Cheesecake: A Cozy Treat for Any Occasion
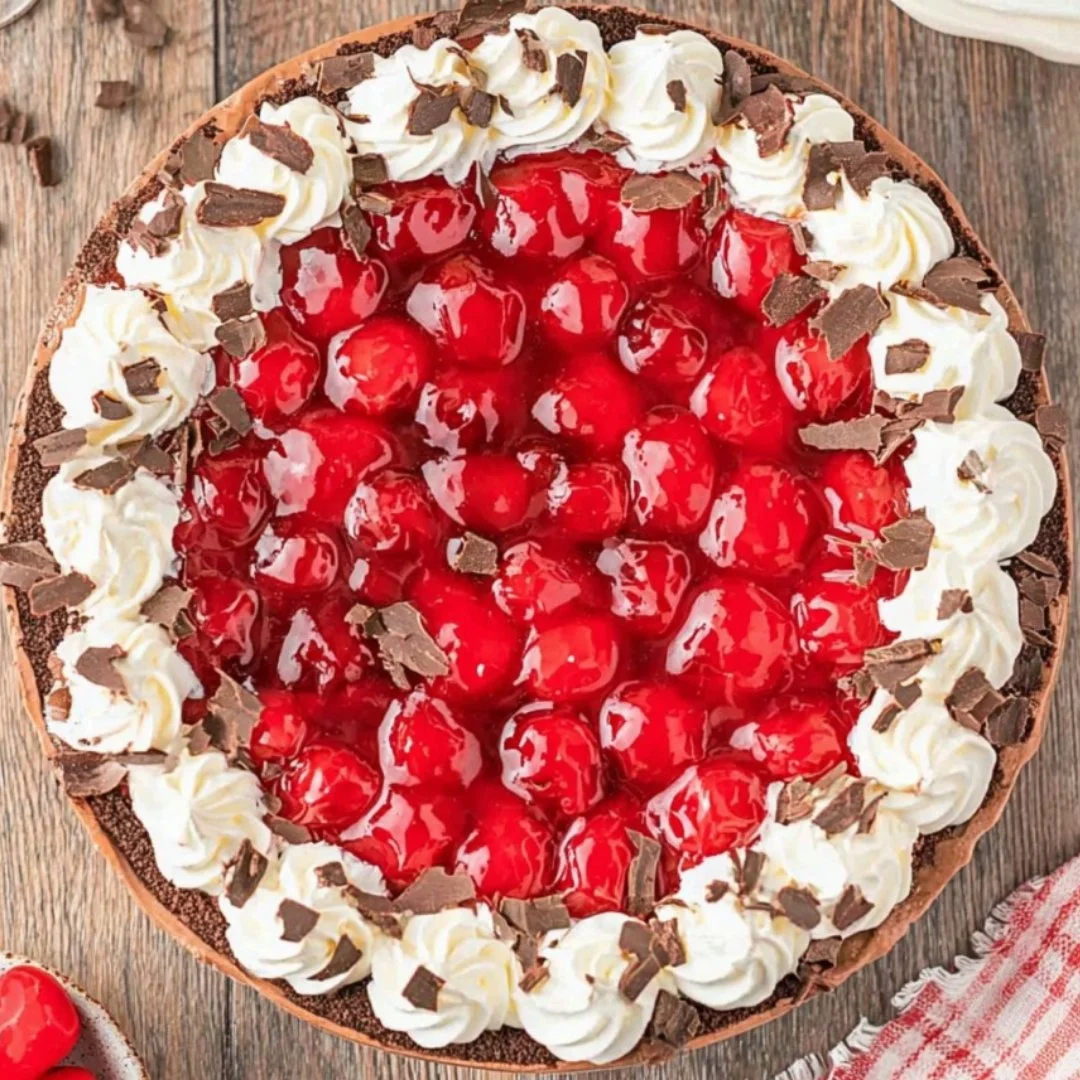
There’s something undeniably heartwarming about a creamy cheesecake layered with sweet cherries and chocolate. It brings to mind memories of family gatherings, where laughter and joy fill the air, and dessert is always the grand finale. Growing up, I remember my grandmother creating a delightful treat similar to this No Bake Black Forest Cheesecake, her secret ingredient being love, of course. As we approach special occasions or simply cozy evenings at home, this delightful dessert is sure to evoke warmth and memories.
This No Bake Black Forest Cheesecake is not just a dessert; it’s an experience. The combination of rich, velvety cream cheese and the tartness of cherry pie filling blends beautifully with the crumbly chocolate cookie crust. It’s an easy, crowd-pleasing dessert that feels like a hug on a plate. Trust me, this is one you’ll definitely want to pin for later!
Why You’ll Love This Recipe
- Quick and Easy: No oven required! This is a simple no-bake dessert that you can whip up in no time.
- Crowd-Pleasing Delight: Perfect for parties, potlucks, or just a family movie night—everyone will love it.
- Creamy and Indulgent: Each bite is a perfect blend of creamy, rich cream cheese and luscious cherry flavor.
- Versatile: You can easily customize it with different flavors or toppings!
- Make-Ahead Friendly: Ideal for busy days—prepare it a day in advance and let it chill till serving.
Ingredients You’ll Need for No Bake Black Forest Cheesecake
- 2 cups chocolate cookie crumbs
- 1/2 cup unsalted butter, melted
- 16 oz cream cheese, softened
- 1 cup powdered sugar
- 1 cup heavy whipping cream
- 1 cup cherry pie filling
- 1/2 cup chocolate shavings
- Whipped cream for topping
Let’s Make It Together
- In a bowl, combine chocolate cookie crumbs and melted butter. Press into the bottom of a 9-inch springform pan to form the crust.
- In a large mixing bowl, beat cream cheese until smooth. Gradually add powdered sugar and mix until combined.
- In another bowl, whip heavy cream until stiff peaks form. Gently fold whipped cream into the cream cheese mixture.
- Spread half of the cream cheese mixture over the crust. Top with cherry pie filling.
- Add the remaining cream cheese mixture on top and smooth out the surface.
- Chill in the refrigerator for at least 4 hours or until set.
- Before serving, top with whipped cream and chocolate shavings.
Delicious Variations to Try
- Berry Bliss Variation: Swap out the cherry pie filling for your favorite berry, like strawberries or blueberries. Top with fresh fruit for an added crunch!
- Mint Chocolate Twist: Add a few drops of peppermint extract to the cream cheese mixture and use crushed mint chocolate cookies for the crust.
- Zesty Lemon Layer: Incorporate a layer of lemon curd between the cream cheese layers for a refreshing tang.
- Nutty Addition: Sprinkle chopped nuts such as almonds or walnuts on top before serving for a delightful crunch.
Chef Emma’s Helpful Tips
- Perfectly Soft Cream Cheese: Make sure your cream cheese is room temperature for a smooth, lump-free filling. Leave it out for about an hour before you begin.
- Make Ahead: This cheesecake can be made a day in advance. Just keep it covered in the refrigerator for ultimate freshness!
- Slicing Tips: For clean slices, dip your knife in hot water and wipe it off after each cut—this will keep your cheesecake looking beautiful!
- Storage Suggestions: Store any leftovers in an airtight container in the refrigerator for up to 4 days. It won’t last long, I promise!
What’s Inside – Nutrition Breakdown
- Serving size: 1 slice
- Calories: 360
- Carbohydrates: 30g
- Sugar: 24g
- Fat: 26g
- Protein: 4g
- Sodium: 320mg
Frequently Asked Questions
Can I make this ahead?
Absolutely! This cheesecake is perfect for making ahead of time. It can be prepared a day in advance and kept in the fridge.Can I use different ingredients?
Of course! Feel free to experiment with different cookie bases or pie fillings to suit your taste.How do I store leftovers?
Store leftovers in an airtight container in the refrigerator for up to 4 days. Good luck keeping it around that long!How long does it last?
This No Bake Black Forest Cheesecake will last about 4 days in the fridge, assuming it doesn’t disappear before then!
Wrapping It Up
This No Bake Black Forest Cheesecake is an indulgent, easy dessert that everyone will cherish. The layers of fluffy cream cheese and cherry pie filling are perfectly complemented by a crisp chocolate crust. Whether it’s a holiday gathering or a simple family dinner, this dessert is sure to create sweet memories. Don’t forget to save this No Bake Black Forest Cheesecake to your Pinterest board so it’s ready when you need a cozy treat!
Print
No Bake Black Forest Cheesecake
- Total Time: 240 minutes
- Yield: 8 servings 1x
- Diet: Vegetarian
Description
A creamy cheesecake layered with sweet cherries and chocolate, perfect for any occasion.
Ingredients
- 2 cups chocolate cookie crumbs
- 1/2 cup unsalted butter, melted
- 16 oz cream cheese, softened
- 1 cup powdered sugar
- 1 cup heavy whipping cream
- 1 cup cherry pie filling
- 1/2 cup chocolate shavings
- Whipped cream for topping
Instructions
- In a bowl, combine chocolate cookie crumbs and melted butter. Press into the bottom of a 9-inch springform pan to form the crust.
- In a large mixing bowl, beat cream cheese until smooth. Gradually add powdered sugar and mix until combined.
- In another bowl, whip heavy cream until stiff peaks form. Gently fold whipped cream into the cream cheese mixture.
- Spread half of the cream cheese mixture over the crust. Top with cherry pie filling.
- Add the remaining cream cheese mixture on top and smooth out the surface.
- Chill in the refrigerator for at least 240 minutes or until set.
- Before serving, top with whipped cream and chocolate shavings.
Notes
Make sure your cream cheese is at room temperature for a smooth filling. This cheesecake can be made a day in advance.
- Prep Time: 15 minutes
- Cook Time: 0 minutes
- Category: Dessert
- Method: No-Bake
- Cuisine: American
Nutrition
- Serving Size: 1 slice
- Calories: 360
- Sugar: 24g
- Sodium: 320mg
- Fat: 26g
- Saturated Fat: 15g
- Unsaturated Fat: 5g
- Trans Fat: 0g
- Carbohydrates: 30g
- Fiber: 1g
- Protein: 4g
- Cholesterol: 70mg
Keywords: cheesecake, no bake, dessert, chocolate, cherry, easy dessert, family recipe